Secure Boot when dual-booting Arch Linux and Windows
I recently got a new laptop, and wanted to setup a dual-boot solution. To do this, most guides simply tell you to disable Secure Boot and then leave it that way. I wanted to keep Secure Boot enabled.
Secure Boot basics
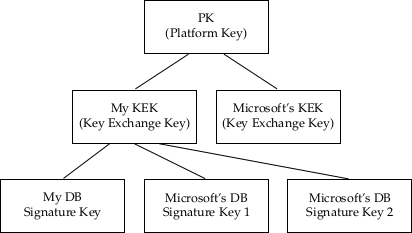
I will construct a PKI according to the image below. There are three types of keys in a Secure Boot PKI.
- Platform Key (PK): A single root key, used to sign the Key Exchange Keys below it.
- Key Exchange Key (KEK): One or more keys used to sign changes to the DB and DBX databases.
- DB Signature Key (DB key): One or more keys used to sign EFI binaries that should be allowed to boot.
A simplified, but almost correct, description is that DB keys sign the EFI binaries (bootloader, kernels, etc.) that should be allowed to boot. To show which DB keys are allowed to do so, valid DB keys must be signed by a KEK. In the same way, all KEKs must be signed by the Platform Key.
In my case, I want to use my own keys to sign the Arch Linux bootloader and kernel, but also allow Microsoft’s keys which will have signed the Windows bootloader. Thus I want a PKI as shown below:
Note that since I don’t have Microsoft’s private KEK key, I need to sign their DB certificates with my own KEK.
There are actually two options here:
- Include Microsoft’s DB certificates only in the DB, which allows bootloaders signed by Microsoft to run.
- Include Microsoft’s KEK certificate, and DB certificates, which allows Microsoft to actually modify DB and DBX, including updating its DB certs, but also blacklist malicious code by adding entries to the DBX.
I will select option 2, since option 1 means that no blacklisting will occur since Microsoft will not have any key that is allowed to modify my DBX.
The following steps have been tested on Arch Linux, for this the following two packages are required: efitools sbsigntools.
Generating keys
Create a GUID for owner identification:
$ uuidgen --random > guid.txt
Create platform key (and store in PEM, CRT and EFI Signature List format)
$ openssl req -newkey rsa:2048 -nodes -keyout pk.key -new -x509 -sha256 -days 3650 -subj "/CN=zozs Platform Key/" -out pk.pem
$ openssl x509 -outform DER -in pk.pem -out pk.crt
$ cert-to-efi-sig-list -g "$(< guid.txt)" pk.pem pk.esl
Create Key Exchange Key (same way as above)
$ openssl req -newkey rsa:2048 -nodes -keyout kek.key -new -x509 -sha256 -days 3650 -subj "/CN=zozs Key Exchange Key/" -out kek.pem
$ openssl x509 -outform DER -in kek.pem -out kek.crt
$ cert-to-efi-sig-list -g "$(< guid.txt)" kek.pem kek.esl
Create your own DB key (same way as above)
$ openssl req -newkey rsa:2048 -nodes -keyout db_arch.key -new -x509 -sha256 -days 3650 -subj "/CN=zozs Signature DB Key, Arch/" -out db_arch.pem
$ openssl x509 -outform DER -in db_arch.pem -out db_arch.crt
$ cert-to-efi-sig-list -g "$(< guid.txt)" db_arch.pem db_arch.esl
Downloading and preparing Microsoft's keys
Download Microsoft’s KEK (if desired), and convert to PEM and ESL (with Microsoft’s GUID)
$ curl -L -o MicCorKEKCA2011_2011-06-24.crt 'https://go.microsoft.com/fwlink/?LinkId=321185'
$ openssl x509 -inform DER -outform PEM -in MicCorKEKCA2011_2011-06-24.crt -out MicCorKEKCA2011_2011-06-24.pem
$ cert-to-efi-sig-list -g 77fa9abd-0359-4d32-bd60-28f4e78f784b MicCorKEKCA2011_2011-06-24.pem MicCorKEKCA2011_2011-06-24.esl
Download Microsoft’s DB certificates, convert to PEM and ESL (with Microsoft’s GUID)
$ curl -OL https://www.microsoft.com/pkiops/certs/MicWinProPCA2011_2011-10-19.crt
$ curl -OL https://www.microsoft.com/pkiops/certs/MicCorUEFCA2011_2011-06-27.crt
$ openssl x509 -inform DER -outform PEM -in MicWinProPCA2011_2011-10-19.crt -out MicWinProPCA2011_2011-10-19.pem
$ openssl x509 -inform DER -outform PEM -in MicCorUEFCA2011_2011-06-27.crt -out MicCorUEFCA2011_2011-06-27.pem
$ cert-to-efi-sig-list -g 77fa9abd-0359-4d32-bd60-28f4e78f784b MicWinProPCA2011_2011-10-19.pem MicWinProPCA2011_2011-10-19.esl
$ cert-to-efi-sig-list -g 77fa9abd-0359-4d32-bd60-28f4e78f784b MicCorUEFCA2011_2011-06-27.pem MicCorUEFCA2011_2011-06-27.esl
$ cat MicWinProPCA2011_2011-10-19.esl MicCorUEFCA2011_2011-06-27.esl > microsoft_db.esl
Signing EFI Signature Lists
Each ESL needs to be signed by the parent key to form a valid PKI. This means that:- The Platform Key (PK) should be self-signed.
- The Key Exchange Keys (KEKs) should be signed by the PK.
- The DB keys shoulde be signed by a KEK.
So, let’s make some signatures. Note the extra -a for append on the following DB signatures. This ensures that the DB will be appended to the current list of valid certificates, rather than replacing the existing ones.
$ sign-efi-sig-list -g "$(< guid.txt)" -k pk.key -c pk.pem PK pk.esl pk.auth
$ sign-efi-sig-list -g "$(< guid.txt)" -k pk.key -c pk.pem KEK kek.esl kek.auth
$ sign-efi-sig-list -g "$(< guid.txt)" -k kek.key -c kek.pem db db_arch.esl db_arch.auth
The following file can be used to remove the PK when in User mode. You should not enroll this
unless you want to revert! This is done by signing an empty file (/dev/null)
$ sign-efi-sig-list -g "$(< guid.txt)" -c pk.pem -k pk.key PK /dev/null remove_pk.auth
Sign Microsoft’s keys with your PK and KEK respectively. Again, note the use of the append flag -a
$ sign-efi-sig-list -a -g 77fa9abd-0359-4d32-bd60-28f4e78f784b -k pk.key -c pk.pem KEK MicCorKEKCA2011_2011-06-24.esl MicCorKEKCA2011_2011-06-24.auth
$ sign-efi-sig-list -a -g 77fa9abd-0359-4d32-bd60-28f4e78f784b -k kek.key -c kek.pem db microsoft_db.esl microsoft_db.auth
Signing your Linux Bootloader and kernel image
Before enrolling keys and rebooting we want to sign our bootloader and kernel, otherwise we won't be able to boot later on.# sbsign --key db_arch.key --cert db_arch.pem --output /boot/vmlinuz-linux /boot/vmlinuz-linux
# sbsign --key db_arch.key --cert db_arch.pem --output /boot/EFI/BOOT/BOOTX64.EFI /boot/EFI/BOOT/BOOTX64.EFI
In my case I also sign the systemd-boot binary (should be the same as by BOOTX64.EFI above, but I’m not sure which one is actually booting)
# sbsign --key db_arch.key --cert db_arch.pem --output /boot/EFI/systemd/systemd-bootx64.efi /boot/EFI/systemd/systemd-bootx64.efi
You should probably look into how to automate this, so that a kernel update does not remove your signature. Look e.g at the Arch wiki https://wiki.archlinux.org/index.php/Secure_Boot#Signing_kernel_with_pacman_hook.
Enrolling keys in firmware
This depends completely on how your system's UEFI interface is designed.In general, you need to perform the following steps:
- Copy all
.esland/or.authfiles to a FAT-formatted file system, either a USB stick, or for example the EFI System Partition. - Clear the current Secure Boot keys. This puts your Secure Boot in “Setup mode”, ready to accept new keys.
- Enroll the DB files. Start with the first signed DB-file (the one created without the
-aflag, in this casedb_arch.{esl,auth} - Add the remaining DB files, in this case
microsoft_db.{esl,auth}. - Do the same thing for the KEKs. Start with your own KEK, then add Microsoft’s KEK.
- Finally, add your PK. This should be added last, since after this Secure Boot will go back to “User mode” where signatures are enforced.
- Note that you should not enroll the file
remove_pk.authwhich will remove the PK. Save it somewhere safe if you need it in the future.
I have tested this on my Lenovo ThinkPad T470s, where you can perform the following steps.
Unfortunately, my laptop does not seem to have a built-in tool to enroll keys, so I use the KeyTool.efi tool included in the efitools package.
Copy it to the EFI System Partition. You may want to sign it using your db key first, if you want to launch it after you have enabled secure boot.
- Copy
/usr/share/efitools/efi/KeyTool.efito your ESP. - Sign it with
sbsignas above. Keey an unsigned copy for later testing. - If desired: add it to your bootloader to ease starting it later on.
- Copy all
.esland.authfiles to the EFI System Partition (I put them in a directory calledsecureboot, but this shouldn’t matter). - Reboot system and enter UEFI Setup Utility (BIOS).
- Go to Security - Secure Boot
- Reset to Setup Mode.
- Clear all keys.
- Reboot and launch KeyTool.
- Follow the instructions at http://www.rodsbooks.com/efi-bootloaders/controlling-sb.html#keytool to enroll keys using KeyTool.
- After enrolling the PK (which you should do last), reboot into UEFI Setup Utility and enable Secure Boot. I had to do this manually, even though KeyTool said that it was enabled after enrolling the PK.
If you wish to test that Secure Boot works correctly, try to launch the (unsigned) Keytool binary. It should not boot but instead give an error message containing the text Security Policy Violation
You should now be finished with configuring Secure Boot on your system!